Friday, June 10, 2011

Out With the Old in With the New


I had these old shelves from our condo that I didnt know what to do with since I didn't want the cherry color anymore. They sat in our closet for over a year and finally I decided to find them a place in our home. There's a black clock in our kitchen hanging next to our table that looked a little lonely, so I decided they would become buddies.

First I went to Home Depot and got some of this
I gave them a fresh coat of flat black paint. Added some green foam to a couple boxes from Hobby Lobby for $2 each and some cut flower stems from Hobby Lobby as well for $1 a piece, and stuck them into the foam like so...

Now our clock isn't so lonely anymore and our wall has some added beauty!

Bruschetta With Feta


This recipe can be used for different things such as an appetizer, snack, lunch, a side ect. I actually had this for lunch the other day and it hit the spot! Whats nice about this recipe is that you can add as little or as much of the ingredients as you'd like. I don't really measure how much I use of what so this is just and estimate.

Serves: 2

6 Fresh basil leaves, chopped
1 Large Roma tomato, cored and chopped
1 Large garlic clove minced
2 Tbs. of Feta cheese
1 1/2 Tbs. Olive oil
1 tsp. Balsamic vinegar
1 Baguette Loaf

Mix first 6 ingredients and set aside. Take the baguette and cut into 1/4in. slices. Place on a baking sheet under the broiler on middle rack. broil about 5-7 min. just till toasted on top. Make sure to watch them so they don't burn since they tend to toast pretty quickly. Remove from oven and let cool for a few minutes before serving with the bruschetta on top each slice. Or just dip the baguette slices like I do, same as chips and salsa style!

Thursday, June 9, 2011

Tomato, Avocado, and Cheddar Burrito


I made this for lunch yesterday and LOVED it!

Serves: 4

4 (10-inch) whole wheat tortillas
3 Plum tomatoes, cored and thinly sliced
4 Tbs.thinly sliced red onions *(I put 4-5 thin slices instead of using Tbs.)
1 ounce low-fat Cheddar cheese, grated (about 1 cup) *(i just cut small slices)
1 firm, ripe avocado, pitted, peeled, and thinly sliced
Freshly ground black pepper to taste
8 Large basil leaves
4 cups shredded romaine lettuce *(I used arugula and spinach, any lettuce works)

Position a rack 4 inches below the broiler and heat the broiler to high. Alternatively, have a ready cast-iron griddle or other heavy-bottom pan and when ready to cook, heat it over medium-high heat.

Lay the tortillas on the work surface. Arrange the tomatoes in a straight line down the center of each tortilla, slightly overlapping them and dividing them equally among the 4 tortillas. Divide the onion among the tortillas, evenly spreading it down each row of tomatoes. Sprinkle the cheese on top of each.

Carefully slide one tortilla onto a rimless baking sheet and place under the broiler until the cheese is melted and bubbling, about 1 minute. Or transfer 1 or 2 tortillas to the griddle and heat until the cheese is melted and bubbling, about 2 minutes.*(I covered with a lid to help melt cheese quicker)

Slide the warmed tortillas onto a plate. Repeat with the remaining tortillas.

Top the warmed cheese with one-fourth of the avocado slices. Grind a little black pepper on top, if desired. Tear 2 basil leaves into small pieces and sprinkle over the vegetables. Top with 1 cup of lettuce and roll up the burrito into a tight cylinder. Repeat with the remaining burritos.

Slice each burrito in half and serve.

*(Changes made by me)
Adapted from Jillian Michaels, The Master Your Metabolism Cookbook

Tuesday, June 7, 2011

Homemade Wheat Bread


Half-whole-wheat bread

Yield: 1 Loaf
1 cup warm water (110-115 degrees F)
1 tablespoon milk
2 tablespoons oil
2 tablespoons brown sugar
1 teaspoon salt
1 1/2 cups all-purpose flour
1 1/2 cups whole wheat flour
2 teaspoons instant active dry yeast (active dry yeast will work also)

Combine first 6 ingredients in a large mixing bowl; stir.

Add flours and yeast and knead until dough is smooth and elastic, about 10-15 minutes. Place dough in a greased bowl, turning once to grease top. Cover with a clean towel and let rise until doubled, about 40 minutes. *(I cover with a hot wet towel and put in a draft free area, ex: microwave or oven)

Punch dough down; knead for a few minutes until smooth and then form into a loaf. Place in greased loaf pan and cover. Let rise in a warm place until almost doubled in size, about 30 minutes.

Bake at 350 degrees for 30-35 minutes. If loaf starts browning too soon, lightly cover with a piece of foil.

Remove bread from oven and allow to rest in pan for a few minutes. Remove to a wire rack and cover with a cloth. Slice and enjoy while still warm. Leftover bread can be stored in an airtight bag or frozen until needed.

*Changes I made
From tammys recipes

Chicken Tacos With Drunken Beans


serves 4
4 large boneless, skinless chicken breasts
Kosher salt to taste
Freshly ground black pepper to taste
Nonstick cooking spray
3 medium slices nitrate-free turkey bacon *(i used regular)
1 clove garlic, minced
2 medium fresh jalapeƱos, minced
1 large can (16 oz) refried black beans *(I used reg. canned black beans)
1 small can (14.5oz) 99% fat-free chicken broth
1 bottle light beer, preferably corona light *(I used chk. broth instead)
1 cup shredded romaine lettuce
1 cup chopped Roma tomatoes
4 6-inch Ezekiel tortillas *(I used 100% whole wheat tortillas instead)

Dust the chicken with kosher salt and pepper. Place on a preheated grill and cook until done. Chop, and set aside.
Lightly coat a medium skillet with nonstick cooking spray. Lightly brown the bacon. Add the garlic and jalapeƱos, and saute until the garlic is soft and fragrant, 1 to 2 minutes. Add the beans, then slowly add the broth, stirring until smooth. Use half the can of broth, as the beer will bring the beans to the desired consistency. Slowly stir in the beer *(second half of broth). Spoon chopped chicken into 4 tortillas. Serve the beans next to the tacos, shredded romaine, and tomatoes.

*Changes I made
Adapted from Jillian Michaels Master Your Metabolism

Friday, June 3, 2011

DIY Garden Boxes

Last year I decided to start my own garden. I took a trip to my near by Home Depot and bought three 10ft.x1ft.x1in boards and one a little shorter in length. I then had them cut so I ended up with four 5ft.x1ft.x1in boards and four 3ft.x1ft.x1in boards when I was done. My husband then reinforced them with nails and screws like so
This is how it will look when you are done
Next clear an area where you want your boxes to sit of rock, weeds, ect., and try to make the ground level. I did this w a square shovel so that my boxes could lay even on each side. After this we added some drip lines that went under the boxes and up through the soil.
Lastly plant some of your favorite veggies with one of your favorite helpers!
In just a few months your garden will look like this
You may even grow an 11 inch zucchini like mine!

Cow for a Buck

I found this cow for $1 at a yard sale. All I did was apply some fresh paint and now it sist on the shelf above my 2yr old sons crib. Hes OBSESSED with farm animals so it was a perfect, inexpensive find.

Kitchen Make Over

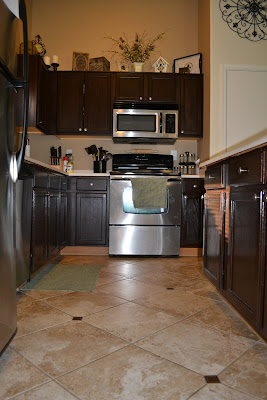
When we moved into our house a couple years ago we only had two days to pick paint for the wall. If any of you have ever painted your home, you know it takes more than 2 days (I had less than 2 because I was juggling a 2yr old and a 7 month old). Any way heres what it looked like before we recently changed a few things.Not really diggin the orange cabinets. Brown was the only color I could think of that went with them. In January of this year I couldnt stand looking at them anymore and so my sis inlaw told me about this stuff... It was a dream come true. First I picked out a paint color for the kitchen walls and painted them. After a couple days of drying I started on the stain. Dont forget to tape around the edges of cabinets before hand to prevent wall stains. Heres how we applied this awesomeness to our cabinets.
1)Wash cabinets REALLY WELL with soap and water and let dry.
2)remove cabinet doors
3)Stain around the edges and sides of cabinets.
4)This step is a little tricky since you have to move quickly before the stain gets tacky. Place doors on a raised surface (i used two 5 gallon buckets) and begin staining. Paint the creases first then the outer edges making sure to paint in the direction of the grain on the cabinets. Make it neat but doesn't need to be perfect since more applications can be applied once the first coat is dry.
5)Apply an extra coat till desired look is achieved.
I applied two coats of stain to mine because I like the subtle uneven look of the stain for a more natural stained look. If you want a more even look then apply more coats.
6)Hang doors back on
After stain was done
After hardware and some decorating was done

Thursday, June 2, 2011

The Start of Something New

I've decided to start this blog to share some of the thing that I enjoy doing, with others. I don't have a specific thing that I will dedicate this blog to because there's so many things I love to do. Some of the things I love are cooking, crafting, baking, gardening, homemaking, being a mommy, family, decorating....and the list goes on! I hope that I can help others to find joy in some of these things as well. ENJOY!!